Project Objective & Introduction
One day when Yuchong and Jie were discussing on what they planned to do for their ECE 5725 project, Jie's received a email from Cornell Alert reporting a home burglary where the criminal sneaked into a house. An idea popped in their minds: How about building a home security sytem to protect their homes and loved ones in it?
This system should be powerful enough so that Jie and Yuchong could watch the real time CCTV stream video and audio of their front doors from anywhere. Also, the system should be smart enough to automatically recognize their faces and open the doors while deny the faces of intruders. Even more, this system should enable remote control so that even if Yuchong forgets bringing the key, Jie still could open the door remotely while sitting at Phillips hall.
Home Pi, our project, is a security system desgined for protecting the front doors of our home. This system streams live video and audio CCTV based on Picamera and Microphone to a webserver, which an android phone could access to. This system provides fast face recognition and real-time semantic segmentation based on Tensorflow and OpenCV powered by Coral TPU. An Android application should be able to access the system remotely.
Design
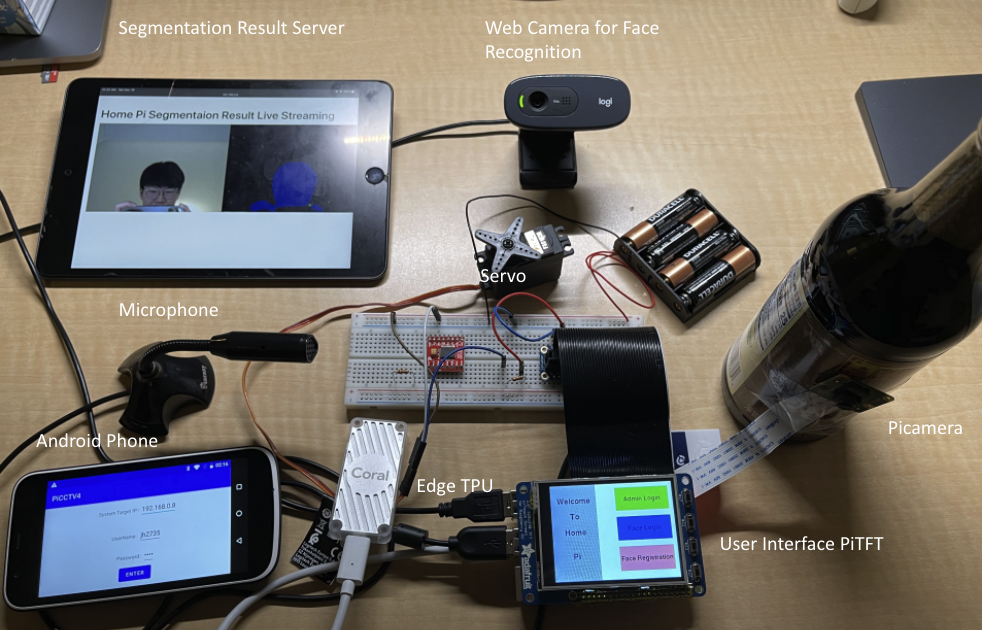
Home Pi is a RPi embedded system apparatus consisting of a user interface, a android phone for remote control, a CCTV and its streaming server, a TPU and a webcam for smooth face recognition and a servo module for door control. Our system enable users to monitor the CCTV remotely via capturing video and audio through a Pi Cam and a microphone. The image and audio could be transmitted to a anrdoid phone, which could remotely control the system, via WiFi. Also, an extremely smooth face recogntion module powered by the powerful USE edge TPU enable face recognition and face registration.
Android App
This system allows users to control it remotely via Android App. This android application should allow users to login via username and password. The authorized users could access live CCTV, the live semantic segmentation results and also control the door based on socket communication with the system.
Multiprocessing Algorithms
In our project, the RPi has to perform tasks, including face recognition and semantic segementation, video and audio streaming, a multithreading UI, TCP socket communcation and a Flask web application at the same time. To reduce latency, we used Python multi processing to fully take advantage of four cores of RPi.
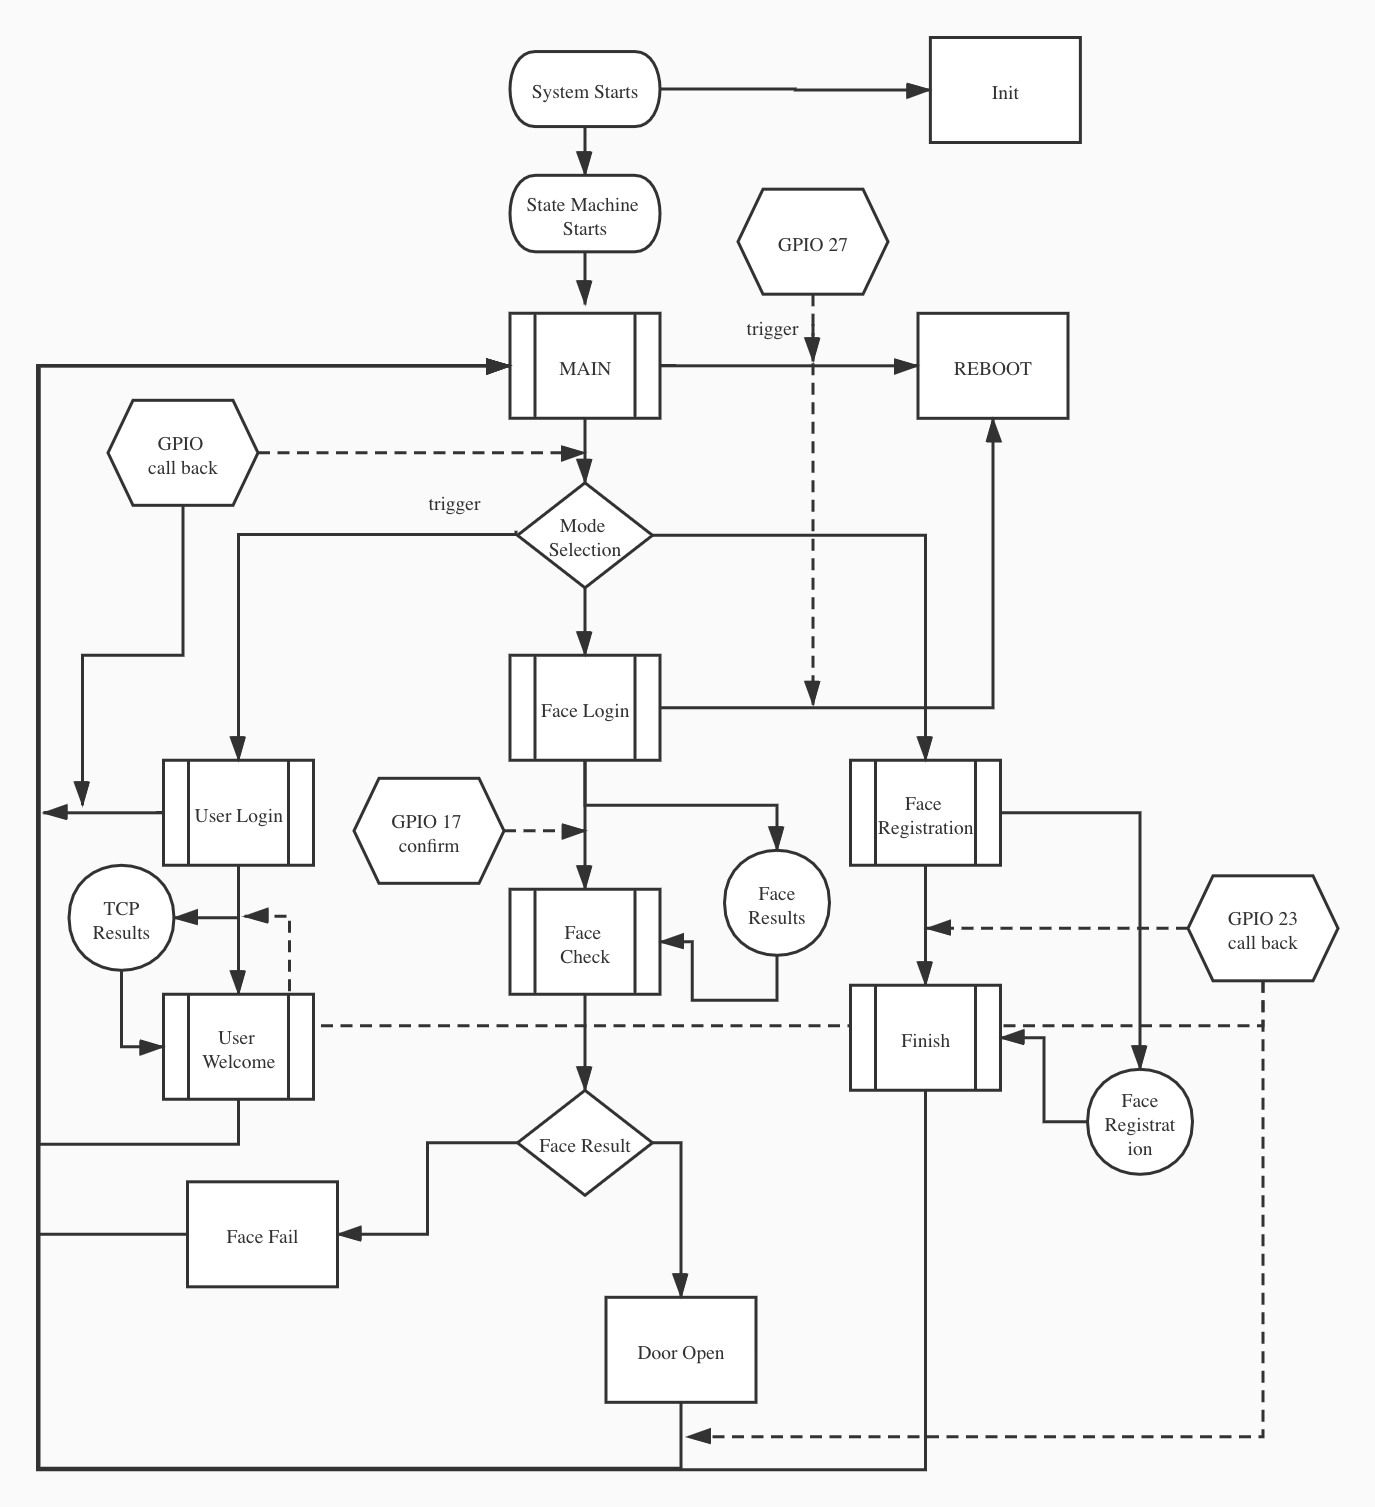
FSM Control Interface
In this project, a user interface is implemented on PiTFT. To control the work flow of the GUI, a finite state machine is designed. This state machine helps the interface behave correspondingly based on the current state and given user inputs and performs state transitions. The FSM could also help the multithread algorithms perform correctly.
Flask-based Stream Server
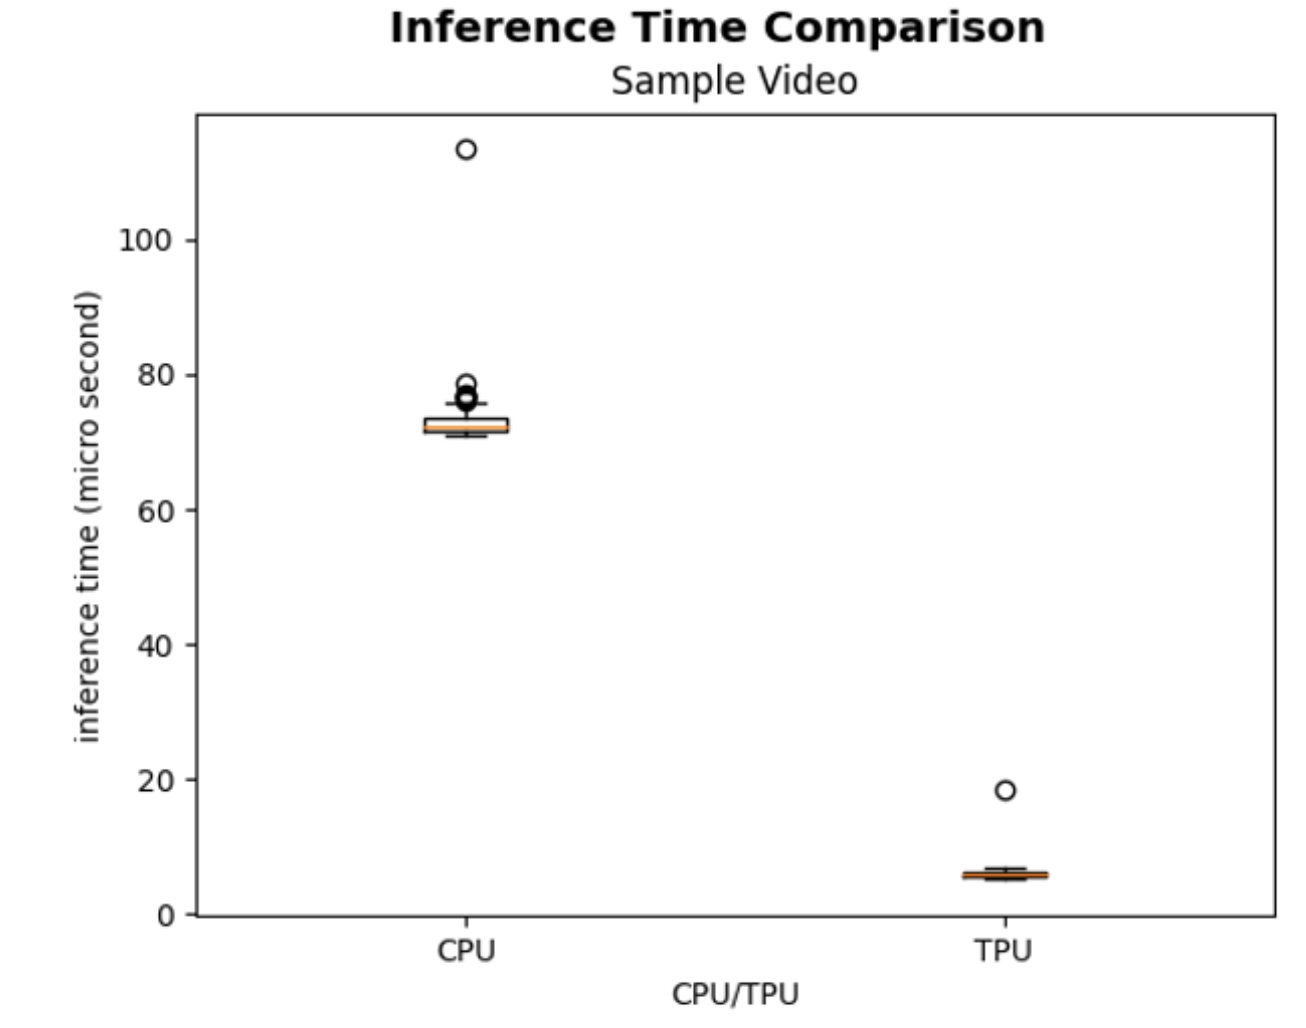
Thanks to the powerful coral TPU, real-time semantic segmentation could be achieved in our project. To show the results, a web video server based on Flask was developed to stream the semantic segmentation results to a server, which could be accessed by Android App and web browser.

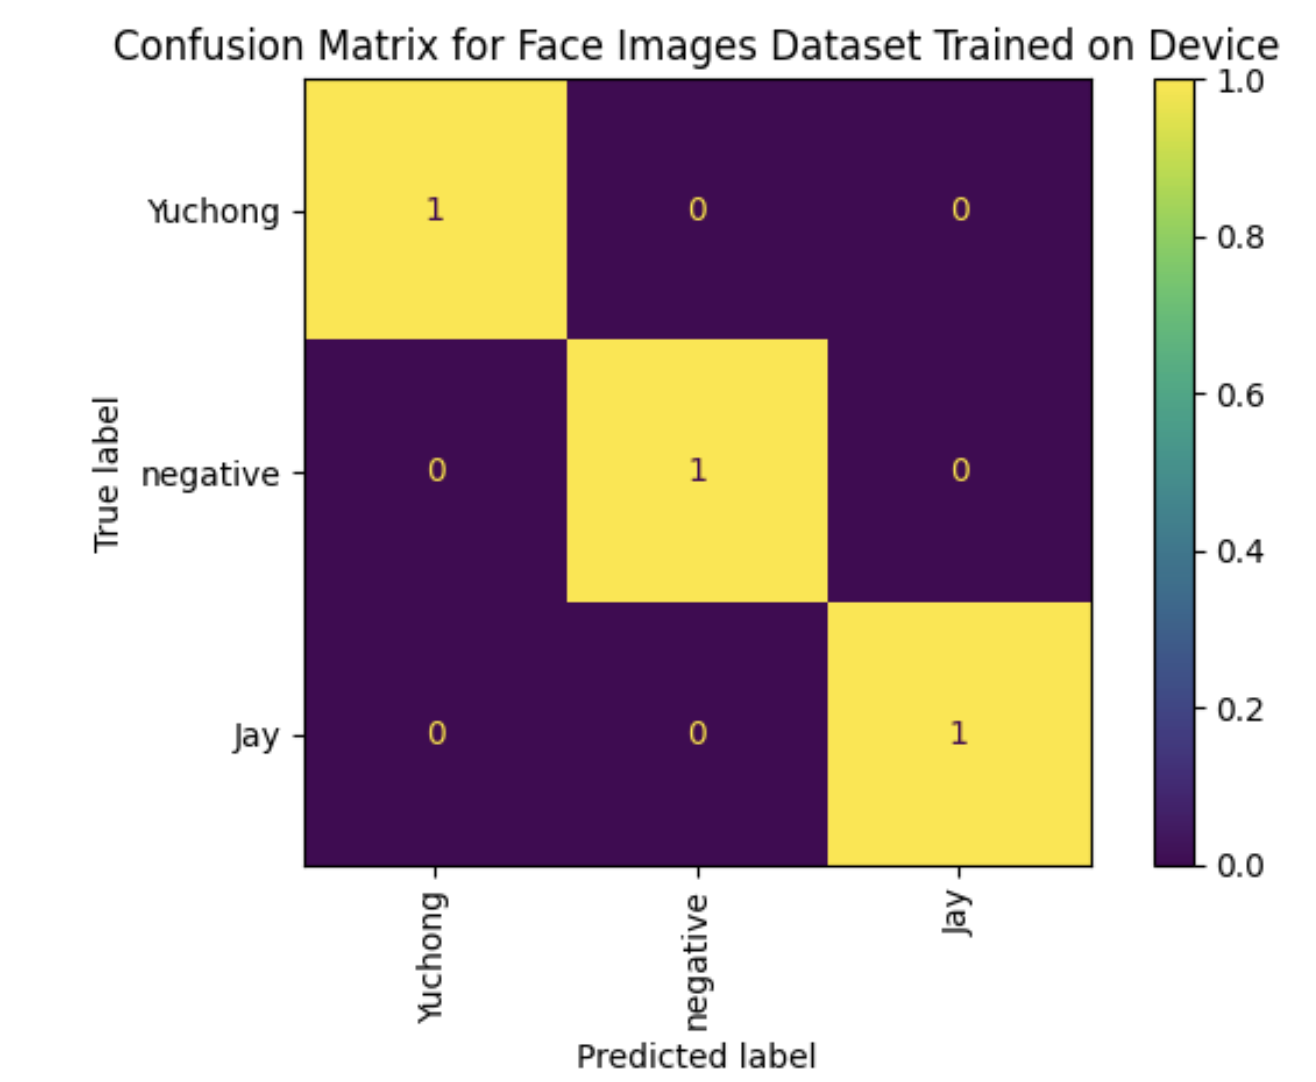
TPU-Based Face Recognition
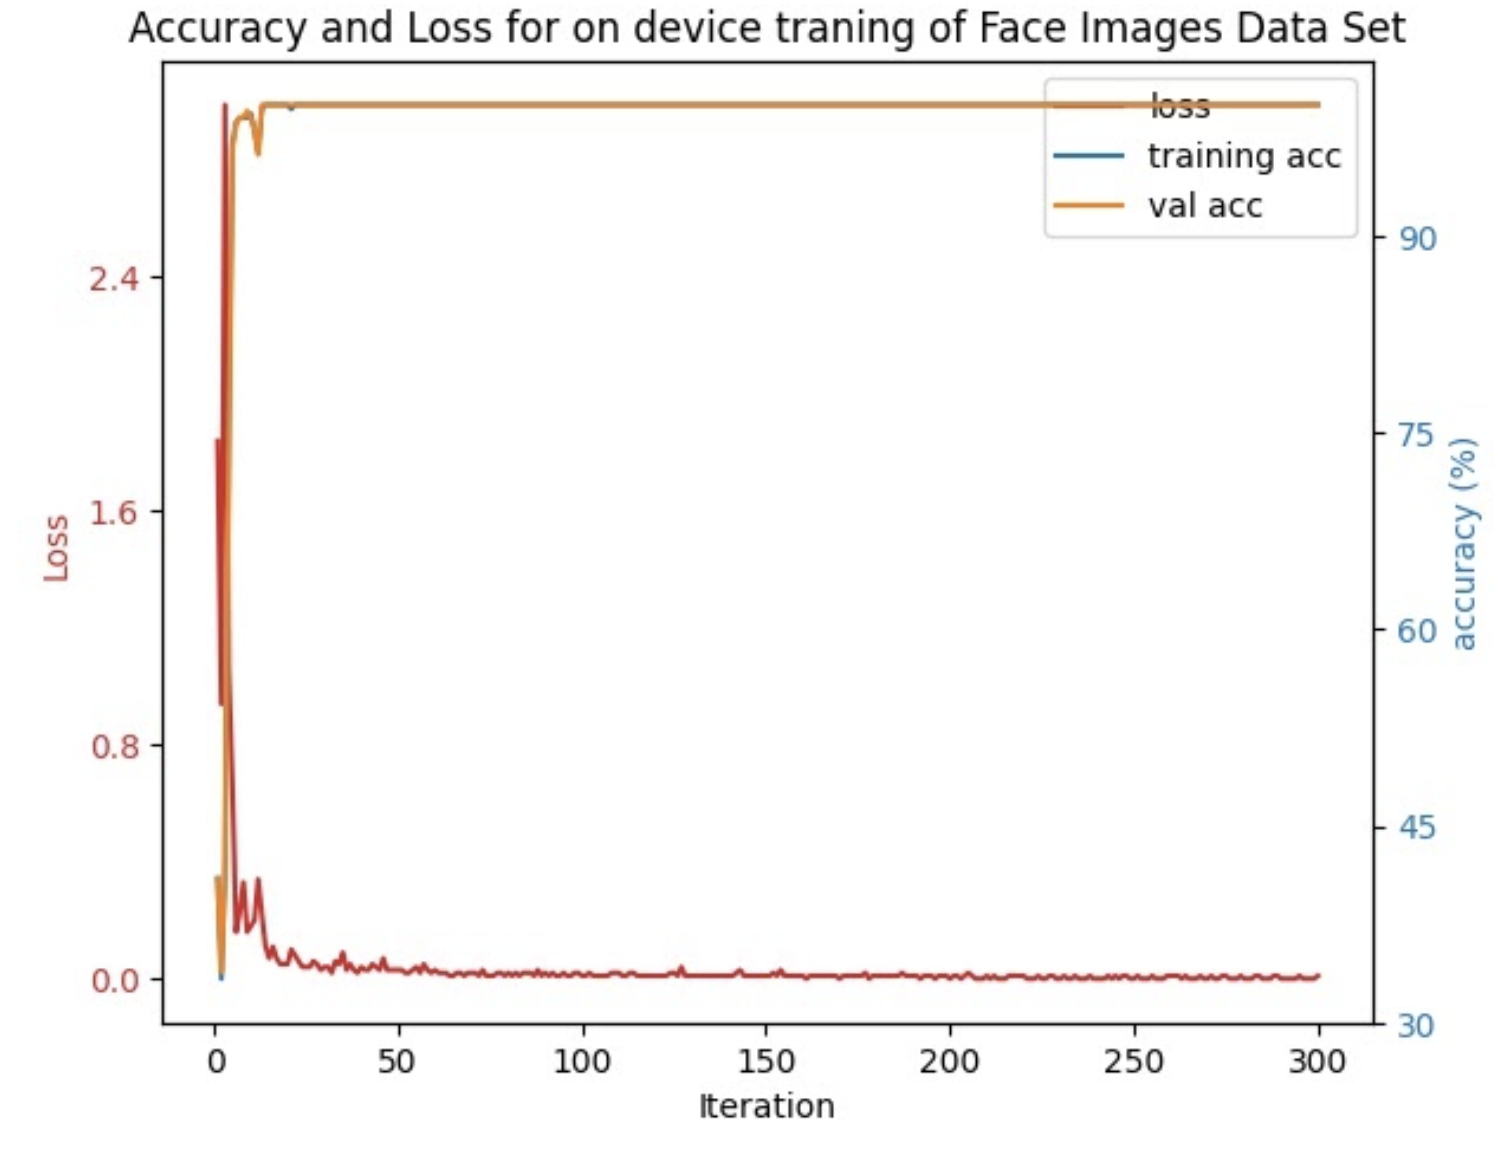
Our system will first run semantic segmentation to obtain the area of interest (ROI) that are related to people. Then, the ROI will be put into a classification model to determine whether the current user is registered. The classification results will be sent to the UI via message queue and to determine whether to open the door.
The above describes the tasks that every core executes. But we still need to figure out how each process could communicate with each other via queues. In our project, the producer processes produce the results and frames. If the producer ceasely put results into the queue, unexpected results would appear. For exmaple, if the face recognition module continuously feeds results into the queue and the UI only asks for results occasionally, the recognition results would be piled up in the queue. The next time when the UI requests the request, it could only get = the outdated piled up results from the front of the queue since queue is First-In-First-Out. In order to resolve this problems, we have two solutions: 1. the producers examines the status of the message queue and clear the outdated results; 2. use LIFO (Last-In-First-Out) queue so that the consumer could always get the newest results. After weighing the pros and cons, we decided to take the first option that the producers clear the outdated results in time since it hep could lower the burden on the system memory and resources. This is a classic producer-consumer design pattern where queue serves as the message pipe and the cache, and the producer process needs to match the speed of the consumer process.
Testing & Issues
In our project, we have tracked issues we met based on timeline. The below is a timeline recording the issues we discovered in our project and also the way how we resolve those problems.
Broken Pi Cam
At first, we have tested every hardware we have got in our project. And we have found out that the PiCam turned out to be a little fragile.
Python Module Installation
For the installation of python modules, since the Raspibian system, we need to pay special attention to users and python version. In our project, we launch our programs with sudo python3. Thus, we need to use sudo pip3 install to make sure every module is installed under super user and Python3.
Multiprocessing Communication
Since mutliprocesses need to communicate with each other, we have researched on several solutions of multiprocessing communication, such as FIFO, Queue. We decided to use Queue and implement the multiprocessing algorithms, since there would be no need to interact with OS frequently thus to increase the efficiency.
Multiple Camera Conflicts
In our project, we used two cameras. However, the camera index is randomly assigned but OpenCV requires the specific number of WebCam is assigned to.
In order to avoid this randomness, we have designed a method to confirm the number which is assigned to web cam using commands v4l2-ctl -d /dev/videoN -D
Clear Text not permitted in Android
When we developed android application viewing the live CCTV, the communication protocol is based on HTTP which is unsecured and not permitted in Android 8.
Also, we also need to configure Internet before launching the App. Thus, we need to include android:usesCleartextTraffic="true" and in the AndroidManifest.xml file.
Internet Conncetion when Initializing
Since our project highly relies on Internet connection, we have included a piece of shell script code to ensure Pi has connected to Wifi before launching the main program.
Servo Issues
For this project, we also use a continuous rotation servo to control a door. However, the servo is not calibrated and it continues to rotate at a slow speed when given a stop signal. To solve it, by looking through the servo’s datasheet, we found that we can calibrate the servo by adjusting the potentiometer. So we calibrated the servo by giving a stop signal and trying to find the position that the servo moves the least.
Memory Allocation
The on-board GPU on Pi may have run out of memory space since we used multiple cameras. Upon investigation, we have found that Pi actually allows users to determine the memory allocation to GPU. We have increased default memory 128 MB to 256 MB.
Test Videos
We followed an incremental testing approach in our development. This enabled our team to parallelize our work seperately, while ensuring each individual of us develop fully functional component before being integrated into the system-at-large. The below videos records how we test each module, and integrate them into a system.
About Us

Jie He (jh2735)
Android, CCTV, User Interface, Multiprocessing Algorithm, Flask, Website
Yuchong Geng (yg534)
Servo Control, Face Recognition, Semantic Segmentation, TPU